

609_Relentov
-
Posts
530 -
Joined
-
Last visited
Content Type
Profiles
Forums
Events
Posts posted by 609_Relentov
-
-
I uploaded a new Zip, now version 1.4
I added two features:
- Once an AI OpFor aircraft returns to a friendly/neutral base and lands, it will be de-spawned once the aircraft stops (there is a function that checks for this every 120 seconds)
- A maximum of 24 AI OpFor aircraft can be spawned and active (alive) at a time, as defined by the glbMaxOpForSpawnable variable; If you attempt to spawn AI OpFor aircraft and it would cause the total number of active (alive) AI OpFor aircraft to exceed this maximum number, you will see a message telling you they cannot be spawned, until the number of active AI OpFor aircraft is reduced by attrition or they land and de-spawn
Also made two fixes:
- Previously the call signs for the spawned OpFor aircraft were fixed (e.g. Enfield11), and hadn't given it much thought, until I was testing and switched sides. Then I saw a bunch of "Enfield11" aircraft all over the place :). So, for OpFor aircraft spawned on the blue/alllied side, they will use more dynamic in-game call signs. Those on the red/axis side will use dynamic numeric call signs.
- With the changes to the SA-342, the OpFor SA-342L and SA-342Mistral were spawning with no/missing weapons. They were corrected such that both are now SA-342L, one with cannon/rocket load out, one with Mistral loadout.
-
Interestingly now it's working - I had another condition in that expression with the isActive, so that may have been the culprit. In any case thanks for putting up your code example to help re-affirm that it's working.
-
Thanks, Kanelbolle, interesting that it works for you. I was utilizing isActive slightly differently, which was not working after the target groups/units were activated.
for i, grp in pairs(coalition.getGroups(coalition.side.RED, Group.Category.GROUND)) do
for idx, theUnit in pairs(Group.getUnits(grp)) do
if (Unit.isActive(theUnit) == true) then-- late activation unit is active
... <do stuff>
end
end
I can try it more how you are using the method/function and see how it goes.
-
What about checking if a group set to late activation has actually been activated? From testing, when using isActive, if it's used on a group that is set to late activation, it returns false both before and after it's activated. I also tried isExist, but that will return true both on groups that are not set to late activation, as well as those that are (before or after activation).
That's what I'm trying to figure out now (i.e. how to check if a group set to late activation has been activated or not).
Thanks for any further suggestions...
-
Thanks cfrag - I ended up coding a work around for what I was doing, but this is good info in that there is actually an addZone function (method) I hadn't known about :).
-
Hmm, so I created a simple mission and added a trigger zone, and looking at the .miz file, I see the table is a bit more involved than I thought above:
["triggers"] =
{
["zones"] =
{
[1] =
{
["radius"] = 12070.08,
["zoneId"] = 495,
["color"] =
{
[1] = 1,
[2] = 1,
[3] = 1,
[4] = 0.15,
}, -- end of ["color"]
["properties"] =
{
}, -- end of ["properties"]
["hidden"] = false,
["y"] = 620280.80453354,
["x"] = -290504.63453896,
["name"] = "CAS search zone",
["heading"] = 0,
["type"] = 0,
}, -- end of [1]
}, -- end of ["zones"]
}, -- end of ["triggers"]
So, I presume I need to create a table with the properties above and append it to the zones table (which is appears to be in the triggers table). I'm actually just trying to create a temporary trigger zone (so I can then search for units within it), not a permanent trigger zone. Any additional thoughts on how best to create a zone via lua/SSE are appreciated.
-
I'm trying to create a trigger zone in one of my scripts, and was looking at the hoggitworld wiki, which shows that a trigger zone table has the following format:
ZoneTable Format
 TriggerZone = {
  point = Vec3,
  radius = Distance
}
In the trigger singleton class, I see a method getZone(), but when I used it against a table I created in the format above, it's not recognizing it as a trigger zone. Is there a method you must use to create a trigger zone, without having to create one manually within the mission via the mission editor?
-
Can’t you simply park a couple of/few (supply) trucks near the launchers? Wouldn’t the launchers then just rearm using the supply trucks when they run out of missiles?
-
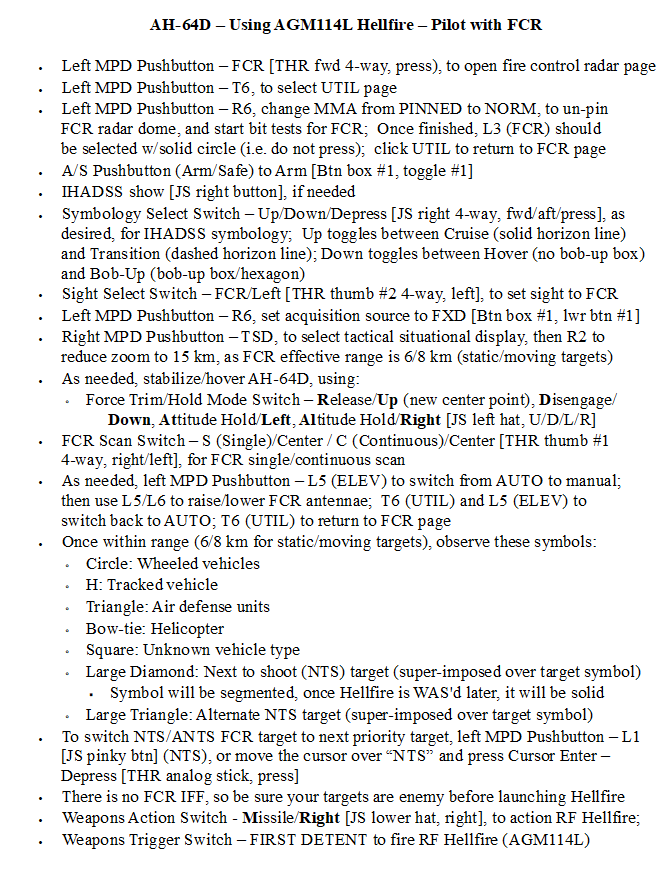
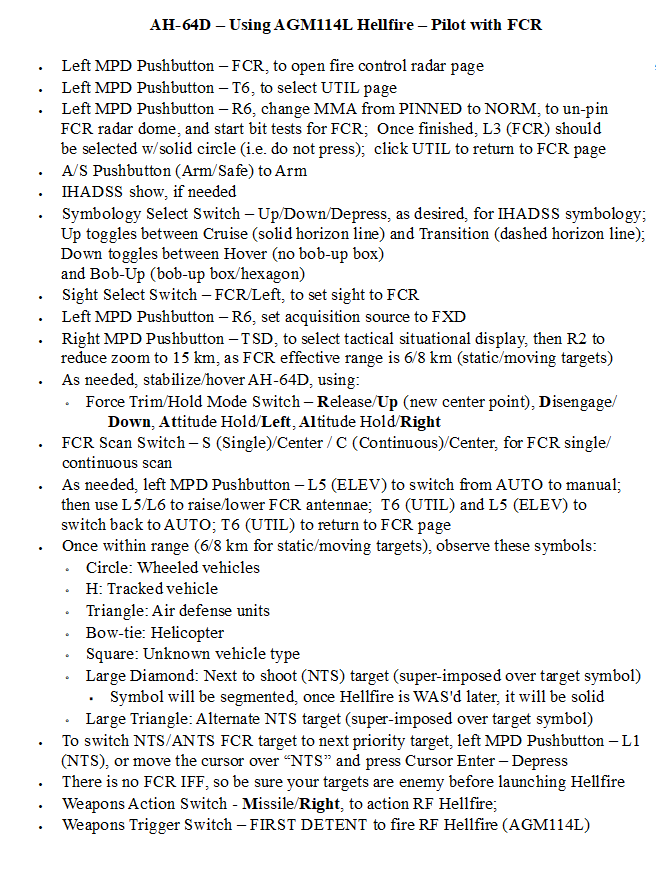
Not sure if these are what you are looking for, but for using the FCR, I recently updated my AH-64D kneeboards for weapons employment to include the AGM-114L using FCR from the pilot / back seat and CP/G / front seat. Specifically, these kneeboards:
AH-64D - AGM114L HELLFIRE PILOT WITH FCR-1.png
AH-64D - AGM114L HELLFIRE PILOT WITH FCR-2.pngAH-64D CPG - AGM114L HELLFIRE WITH FCR-1.png
AH-64D CPG - AGM114L HELLFIRE WITH FCR-2.png
AH-64D CPG - AGM114L HELLFIRE WITH FCR-3.pngPlease see this thread:
-
 1
1
-
-
I've added a three-page kneeboard for employing the AGM114L radar guided Hellfire using the FCR from the CP/G seat:
AH-64D CPG - AGM114L HELLFIRE WITH FCR-1.png
AH-64D CPG - AGM114L HELLFIRE WITH FCR-2.png
AH-64D CPG - AGM114L HELLFIRE WITH FCR-3.png
NOTE: Similar to the recent kneeboard above, as more FCR modes become available, including LINK mode (that will slave the TADS to the FCR NTS), I will probably make additional updates to this kneeboard.
I've also made a very minor update to the following kneeboard, correcting part of the description of the IHADSS overlay display:
AH-64D CPG - AGM114 HELLFIRE-1.png -
With the addition of the FCR (GTM mode), I've added a two-page kneeboard for employing the AGM114L radar guided Hellfire using the FCR from the pilot seat:
AH-64D - AGM114L HELLFIRE PILOT WITH FCR-1.png
AH-64D - AGM114L HELLFIRE PILOT WITH FCR-2.png
NOTE: As more FCR modes become available, including LINK mode (that will slave the TADS to the FCR NTS), I will probably make additional updates to this kneeboard. Also, I plan to add a kneeboard(s) for employing the AGM114L radar guided Hellfire using the FCR from the co-pilot (CP/G) seat, but it may take a bit longer; thus, I wanted to provide this kneeboard sooner rather than later.====================================================================================================
I've added a three-page kneeboard for employing the AGM114L radar guided Hellfire using the FCR from the CP/G seat:
AH-64D CPG - AGM114L HELLFIRE WITH FCR-1.png
AH-64D CPG - AGM114L HELLFIRE WITH FCR-2.png
AH-64D CPG - AGM114L HELLFIRE WITH FCR-3.png
NOTE: Similar to the recent kneeboard above, as more FCR modes become available, including LINK mode (that will slave the TADS to the FCR NTS), I will probably make additional updates to this kneeboard.
I've also made a very minor update to the following kneeboard, correcting part of the description of the IHADSS overlay display:
AH-64D CPG - AGM114 HELLFIRE-1.png -
Thanks for the comments FalcoGer, feedback is always appreciated. A few follow up points:
- I'm assuming you are referring mainly to the two-page kneeboard I just made available this past Sunday, as you mention the FCR. Rocket and gun engagement procedures using FCR are not within the scope of this particular kneeboard, as noted in the name (i.e. just Hellfire)
- As for having too much text, well, I guess that is a matter of taste :). As noted in the original post, "these are not official procedures, just what I've put together as a quick reminder on how to employ various weapons on the AH-64D". When I created these types of kneeboards for most of the modules I own, they were originally for my own personal use. I only made them available first to my squad, then to the DCS community as I thought they might be helpful to some who are new to this/these modules (or haven't flown them for a while) and can use some basic procedures to get them going. I am detail oriented, so I like having procedures laid out that I can follow, especially if it's been a while since I've flown a module and have forgotten most of the procedures - thus the details, some of which you find obvious.
Lastly, one more point is that when I create these kneeboards, I have added actual device mappings, so I can quickly see what joystick/throttle/button box buttons/hats/axis/etc to use for given procedures. This is the primary reason the kneeboards seem "wordy". Then, I strip out the mappings and share those versions of the kneeboards to my squad/DCS community, as they (mappings) would only be applicable to me. Below is an example of the AH-64D - AGM114L HELLFIRE PILOT WITH FCR-1.png released Sunday, first my version with the key mappings, then the public version without, so you can see what I mean.
I will keep it in mind to try and reduce text if possible, but again, I create these first for myself, as my memory isn't what it used to be. So, if there are what seem like extra/obvious details, it's because nothing is obvious for me anymore w/respect to what device and key/hat/axis/etc. I need to use for a particular action!

-
 1
1
-
-
With the addition of the FCR (GTM mode), I've added a two-page kneeboard for employing the AGM114L radar guided Hellfire using the FCR from the pilot seat:
AH-64D - AGM114L HELLFIRE PILOT WITH FCR-1.png
AH-64D - AGM114L HELLFIRE PILOT WITH FCR-2.png
NOTE: As more FCR modes become available, including LINK mode (that will slave the TADS to the FCR NTS), I will probably make additional updates to this kneeboard. Also, I plan to add a kneeboard(s) for employing the AGM114L radar guided Hellfire using the FCR from the co-pilot (CP/G) seat, but it may take a bit longer; thus, I wanted to provide this kneeboard sooner rather than later.-
1
-
2
-
-
Minor update - after testing using AGM-154 JSOWs, I updated the following two kneeboards, adding a note at the end of each page that deploying a JSOW is identical to deploying a JDAM.
F-15ESE - GBU-38 WMM TPOD-LN-2.png
F-15ESE - GBU-38 WMM UFC COORDS-2.png -
Copied from one of my F-15E kneeboards. Formatting changed when pasted. Hopefully this helps as well.
F-15E SE - Updating PACS after re-arming
Updating the Programmable Armament Control Set (PACS)
After re-arming the F-15E SE, all air-to-air missiles, including the AIM-120, AIM-7, and AIM-9, are automatically recognized by PACS. However, only certain smart air-to-ground weapons are recognized - all other air-to-ground weapon types must be manually identified within PACS in order to employ them.
- On any MFD, select PB-11 until "M2" displays
- Select "ARMT" (PB-2)
- Select "A/G LOAD" (PB-7)
- At the top of the MFD, PB-16 through PB-20 will show the type and number of any air-to-ground smart weapons on that station that have been recognized; any weapons not recognized will only show the number of, and not the type
- Select "STEP" (PB-10), until the air-to-ground weapon matching what has been loaded is shown
- Select the appropriate weapon (one of PB-1 through PB-5, PB-12 through PB-14), which will put a selection box around it
- Select all stations from PB-16 through PB-20 that have that weapon type loaded; the weapon type should now show above the number of weapons for that station
- Select "MENU" (PB-11), then select "A/G" (PB-3)
- All updated air-to-ground weapons on their respective stations should now be identified at the top of the MFD
- Repeat the steps above for any additional air-to-ground weapons that have not yet been recognized by PACS
-
1
-
Thanks cfrag! This bug fix broke one of my scripts, so thanks for the suggestion to use Object.getCategory(event.initiator)...
-
38 minutes ago, silverdevil said:
helping out my squad mate
https://pcwiseman.com/downloads_files/F-15E_Kneeboards_by_AKA_Relent_2023-11-23.pdf
Hey, thanks SD! Appreciate you converting those images for me! Have a Happy Thanksgiving SD, all (well, Americans here or living abroad)
-
1
-
-
Hi clanitho - thanks, no, I just create individual PNG images for each kneeboard page, to be viewed in-game of course. I suppose I could create PDFs, assuming as a separate document to use outside of in-game? Let me know your thoughts on this, thanks.
-
I updated one kneeboard and added two JDAM related kneeboards.
Minor update to the following kneeboard to incorporate the new coordinates pop-up dialog in the F10 menu:
F-15ESE - USING UFC TO CREATE MARK POINTS FOR TPOD.png
Added a new 2-page kneeboard for using GBU-38 JDAMS in weapon memory mode using the LANTIRN TPOD to obtain target coordinates:
F-15ESE - GBU-38 WMM TPOD-LN-1.png
F-15ESE - GBU-38 WMM TPOD-LN-2.pngAdded a new 2-page kneeboard for using GBU-38 JDAMS in weapon memory mode using the UFC to enter target coordinates:
F-15ESE - GBU-38 WMM UFC COORDS-1.png
F-15ESE - GBU-38 WMM UFC COORDS-2.png-
1
-
-
After reviewing all of my JDAM-related employment procedures, I've revised all of my JDAM-related kneeboards, some with minor updates, some more significant. Here's the summary:
Replaced the following kneeboard:
FA-18C - GBU-38 JDAM TOO TPOD-A.png
with these two kneeboard pages:
FA-18C - GBU-38 JDAM TOO TPOD-A-1.png
FA-18C - GBU-38 JDAM TOO TPOD-A-2.pngThese now incorporate either dropping JDAMs individually while observing in the ATFLIR TPOD (8 bombs max), or rippling multiple JDAMS (4 bombs max) with a single press/hold. NOTE: Please replace the single page above with the two new pages.
Replaced the following kneeboard:FA-18C - GBU-38 JDAM TOO TPOD-L.png
with these two kneeboard pages:
FA-18C - GBU-38 JDAM TOO TPOD-L-1.png
FA-18C - GBU-38 JDAM TOO TPOD-L-2.pngThese now incorporate either dropping JDAMs individually while observing in the LITENING TPOD (8 bombs max), or rippling multiple JDAMS (4 bombs max) with a single press/hold. NOTE: Please replace the single page above with the two new pages.
Replaced the following kneeboard:FA-18C - GBU-38 JDAM PRE-PLANNED.png
with these two kneeboard pages:
FA-18C - GBU-38 JDAM PRE-PLANNED-1.png
FA-18C - GBU-38 JDAM PRE-PLANNED-2.pngThese now incorporate either dropping JDAMs individually or rippling multiple JDAMS (4 bombs max) with a single press/hold. NOTE: Please replace the single page above with the two new pages.
Updated the following kneeboards:FA-18C - SEMI-RIPPLE GBU-38 JDAM TOO TPOD-A.png
FA-18C - SEMI-RIPPLE GBU-38 JDAM TOO TPOD-L.pngVery minor update, adding "w/Mark Points" to the title/heading to indicate that this method of individually employing JDAMS is via creating/selecting mark points for each target (up to 8 bombs max)
-
Thanks again @Phantom711 for pointing out the updated TOO target designation via TDC depress.
After reviewing all of my JDAM-related employment procedures, I've revised all of my JDAM-related kneeboards, some with minor updates, some more significant. Here's the summary:
Replaced the following kneeboard:
FA-18C - GBU-38 JDAM TOO TPOD-A.png
with these two kneeboard pages:
FA-18C - GBU-38 JDAM TOO TPOD-A-1.png
FA-18C - GBU-38 JDAM TOO TPOD-A-2.pngThese now incorporate either dropping JDAMs individually while observing in the ATFLIR TPOD (8 bombs max), or rippling multiple JDAMS (4 bombs max) with a single press/hold. NOTE: Please replace the single page above with the two new pages.
Replaced the following kneeboard:FA-18C - GBU-38 JDAM TOO TPOD-L.png
with these two kneeboard pages:
FA-18C - GBU-38 JDAM TOO TPOD-L-1.png
FA-18C - GBU-38 JDAM TOO TPOD-L-2.pngThese now incorporate either dropping JDAMs individually while observing in the LITENING TPOD (8 bombs max), or rippling multiple JDAMS (4 bombs max) with a single press/hold. NOTE: Please replace the single page above with the two new pages.
Replaced the following kneeboard:FA-18C - GBU-38 JDAM PRE-PLANNED.png
with these two kneeboard pages:
FA-18C - GBU-38 JDAM PRE-PLANNED-1.png
FA-18C - GBU-38 JDAM PRE-PLANNED-2.pngThese now incorporate either dropping JDAMs individually or rippling multiple JDAMS (4 bombs max) with a single press/hold. NOTE: Please replace the single page above with the two new pages.
Updated the following kneeboards:FA-18C - SEMI-RIPPLE GBU-38 JDAM TOO TPOD-A.png
FA-18C - SEMI-RIPPLE GBU-38 JDAM TOO TPOD-L.pngVery minor update, adding "w/Mark Points" to the title/heading to indicate that this method of individually employing JDAMS is via creating/selecting mark points for each target (up to 8 bombs max)
-
2 hours ago, Phantom711 said:
yes…when you went for the second run, you still had all 4 stations boxed under the QTY option. In that case the TDC depress is assigned to all stations that are boxed. So all 4 stations went for the last target you chose with your TDC depress.
Aha, makes sense, so after the first run of four, I need to go and de-select the four stations before I start designating targets… I’ll have to retest. Thanks
-
@Phantom711 - I tried my semi-ripple procedures (i.e. FA-18C - SEMI-RIPPLE GBU-38 JDAM TOO TPOD-A.png, FA-18C - SEMI-RIPPLE GBU-38 JDAM TOO TPOD-L.png), and they still work OK, using mark points. While a little more tedious to set up, and employ (i.e. switching mark points), I like that I can assign targets to all 8 bombs all at once if I use double-rack pylons.
I also tried the approach you mentioned, mainly using TDC depress on the TPOD (Litening pod in this case) to designate each target and then click STEP on the stores page (also setting mode to TOO first for each), and then repeating TDC depress/STEP up to a max of four targets; then from the JDAM display page clicking QTY and selecting all four stations. One thing I had a challenge with is for the next set of four bombs (i.e. I was using 4 double-rack pylons for a total of 8 GBU-38 JDAMS), when I repeated the procedure, all bombs hit the same target. I'll have to revisit.
In any case, I agree the method you describe is easier, as you can just press and hold the weapon release to ripple up to 4 at a time. Once I figure out my challenges with the second set of four bombs, maybe I'll create new kneeboards for true rippling of JDAMs (4 max at a time).
-
Hey Phantom,
I’m always open to suggestions, I like the idea of adding an option for random aircraft per category, etc. Not sure about adding friendlies, as they (I.e. blue and red AI) would immediately start attacking each other, lol.
I have pondered seeing if I could spawn a friendly wingman as part of my group, so I have help against the OpFor AI, but haven’t done enough testing yet to see if it’s possible dynamically.
The “Repeat” option sounds interesting, too…. I’ll give them some thought, thanks for the suggestions.
Setting a neutral country to red or blue coalition via script?
in Scripting Tips, Tricks & Issues
Posted
I was looking at the hoggitworld SSE documentation, and I didn't see a method that would allow you to assign a country that was currently neutral (e.g. coalition.side.NEUTRAL) to the blue or red coalition (e.g. coalition.side.BLUE, etc.). Is this possible via scripting?
The reason is that it might be nice if a script that required a specific country to be RED or BLUE but was instead NEUTRAL to be automatically assigned to the proper coalition at the start of the mission. I don't see that it's possible given what I've seen in the SSE documentation, and from doing some searches here, but wanted to double check in case someone was able to do this.